How to Switch Label Printers Without Disrupting Production
Considering switching label printers? Maybe lead times are getting longer, a print run came back wrong, or the price of reorders keeps going up without notice.When you’re ready to switch, you still need to keep products labeled, get new labels that match the ones already on the shelf, and make sure the new rolls run on your equipment the first time.
⚞ The Short Version:
- Start before you’re out of labels. A first run with any printer takes longer than a reorder, so switch while you still have stock on hand.
- Collect your files and specs now. Artwork, die size, material, and roll details are easy to get from your current printer before you switch.
- Send your new printer a real label from your current inventory. It’s better for color matching than any file.
- Approve color on a printed proof. A PDF proof works for checking words and layout. A hard copy proof is best for color.
Why you should switch before you run out
A lot of the switch requests we get arrive in a hurry. A current supplier “failed us again” and labels are needed right away, or a limited release is on a tight timeline because the previous printer fell through. We get how brands end up there, and we try to make the switch easy.
Your first order with a new printer has steps a reorder doesn’t. Our team checks your artwork, you approve a proof, a custom shape may need a new die, we’ll select materials and finishing options.
Before you ask anyone for a quote, get a clear picture of where you stand:
- Count your weeks of supply for each SKU. That number tells you how much time you have.
- Check what’s still open with your current printer. Look for open purchase orders, any contract terms, and finished labels they’re storing for you.
What to get from your current printer
Your current printer is probably holding more of your label information than you realize. Ask for it while the relationship is still on good terms.
- Final print-ready artwork files. Ask for the original design files with fonts and images included if you don’t have them. A PDF proof alone won’t be enough to print from.
- Die details. Label size, shape, corner radius, and if the die belongs to you.
- Material specs. The label stock, adhesive, and any laminate or varnish used.
- Color targets. Any Pantone numbers or ink notes on file for your brand colors.
- Roll specs. Core size, roll diameter, labels per roll, and unwind position (more on those below).
- Physical samples. A few labels from your last good run.
If a printer or a designer built your artwork, confirm you have everything a different printer would need to print it. Our artwork file standards list what that includes.
What happens to your plates and dies
If your labels were printed on a flexo press (the traditional, plate-based way of printing labels), your printer made printing plates for each color. Plates are built for a specific press setup, so plan on them staying behind even if you paid for them. Digital presses print without plates. Ours are digital, so there’s nothing to transfer or remake.
Dies work differently. If your label is a standard rectangle, circle, oval, or common can or bottle size, the new printer may already have a die that fits. We keep more than 2,000 standard shapes and sizes in stock.
A custom shape may need a new die. Before you order one anywhere, ask who owns it and who pays if it wears out. With us, a custom die you order is yours. You only pay for it once as long as you’re working with us.
Write down roll label specs
If you apply labels by machine, or a co-packer does, the way labels are wound on the roll matters as much as the artwork. A roll wound the wrong way for your applicator can’t be used, no matter how good the print looks.
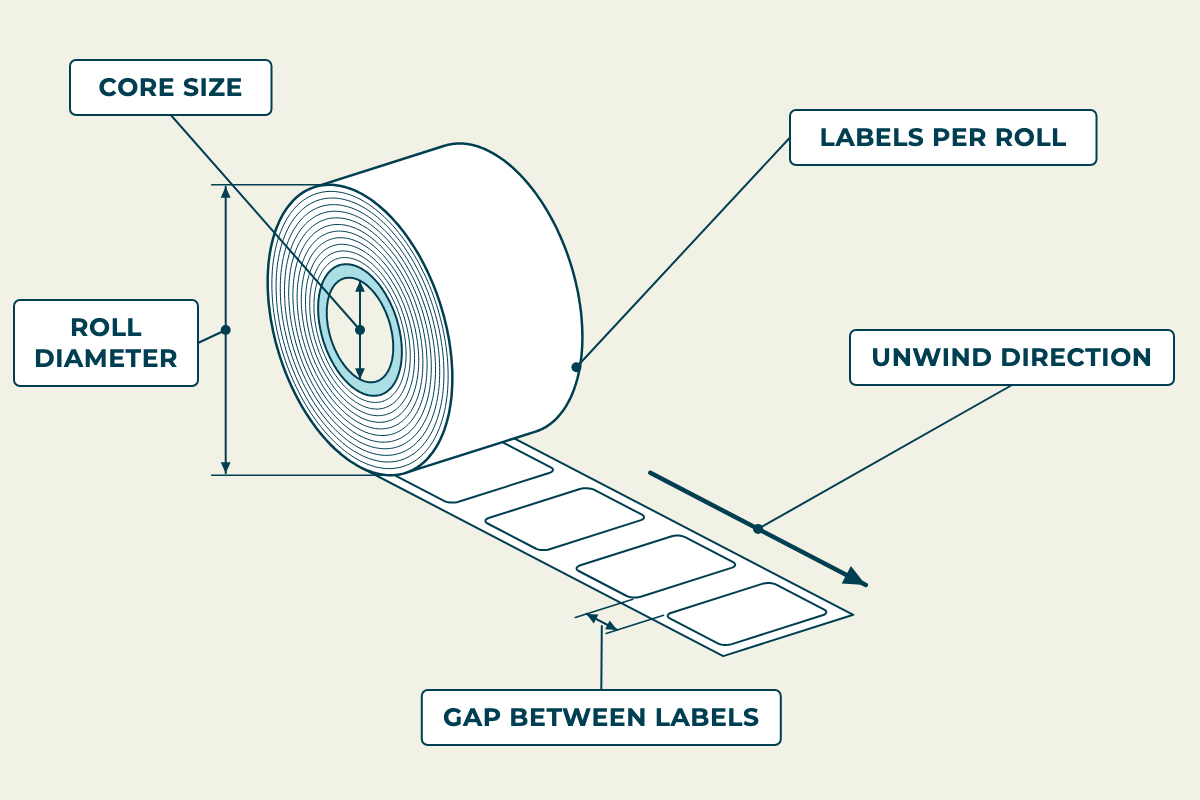
| Spec | What it means | Where to find it |
|---|---|---|
| Core size | The inside diameter of the cardboard tube the labels are wound on. 3 inches is usually standard. | Measure a roll, or check your applicator manual. |
| Maximum roll diameter | The widest a full roll can be and still fit on your machine. | Your applicator manual, or ask your co-packer. |
| Unwind position | Which edge of the label comes off the roll first, and whether the labels face out or in. There are eight possible positions. | An old proof or order confirmation, or unroll a few labels and look. |
| Labels per roll | How many labels come on each roll, which decides how often someone stops to change rolls. | The roll’s label or your last packing slip. |
| Gap between labels | The space between one label and the next on the roll. Some applicators are picky about it. | Measure a roll. |
| Material, adhesive, and finish | What the label is made of, how it sticks, and any matte, gloss, or soft-touch layer on top. | Your current printer’s quote or invoice. |
Sending these up front saves a round of back-and-forth.
Pro tip: the easiest spec sheet is a roll of your current labels. Send one to your new printer, or send photos of it next to a tape measure. If you’re not sure how to read your unwind position, our guide to determining your label unwind position walks through it.
How to make new labels match the ones already on the shelf
For a few weeks, your old labels and your new ones may sit in the same cooler or on the same shelf. If your brand blue shifts even slightly between them, it might confuse shoppers.
Color can change between printers because the press, the inks, and sometimes the label material all change at once. Your old printer may also have adjusted color on press over the years. So your artwork file might not match what’s actually on your shelf anymore.
These steps get the new run as close as possible:
- Send a physical label from current inventory. Tell your new printer that label is what the new run needs to match.
- Call out Pantone numbers for your brand colors. If there’s one color you’d recognize from across a room, say so early.
- Approve color on a hard copy proof. A PDF proof is a picture on a screen, which makes it good for checking words, layout, and barcodes. A hard copy proof is an actual label printed on your actual material. Every job we print gets a PDF proof. A hard copy proof straight off the press is available for a minimal charge.
- Compare the proof and your current label side by side. Put both on the real container, somewhere lit like a store or taproom.
Your label printer switching checklist
Before you ask for quotes
- Count weeks of label supply for each SKU
- Check open purchase orders, contract terms, and any stored inventory at your current printer
From your current printer
- Original artwork files with fonts and images
- Label size, shape, corner radius, and die details
- Material, adhesive, and finish specs
- Pantone numbers or color notes
- Core size, roll diameter, labels per roll, and unwind position
- A roll or labels from your last good run
For your new printer
- A physical label from current inventory as the color target
- How labels are applied (by hand, by machine, or at a co-packer)
- The conditions labels face (cold fill, condensation, cooler, shelf)
Before you switch
- Approve color on a hard copy proof, side by side with your current label
Common questions about switching label printers
Can a new printer use my old printing plates?
Usually not. Flexo plates are made for one press setup, so a new printer will typically make its own or print digitally. Digital presses, like ours, print without plates. Dies for common shapes are often already in a new printer’s stock, while a custom shape may need a new die.
Will my new labels look exactly like my old ones?
They can get very close. Because the press, inks, and material may all differ, confirm the match before a full run. Send a label from current inventory, call out your Pantone colors, and approve color on a hard copy proof next to your existing label.
Do I need a new COLA if I switch label printers?
A COLA approves your label’s content and design, and changing printers doesn’t change either one. If your artwork stays the same, your existing approval still applies. If you adjust the label while switching, TTB’s list of allowable changes spells out what you can revise without reapplying, including label colors, shape, and proportionate size, as long as the label still meets the regulations.
How long does it take to switch label printers?
Most of the variation comes before the press runs. Artwork that needs fixing, a custom die, or a special material all add time. The print run is the predictable part. For a standard job, ours is five working days after an approved proof. Give yourself a buffer beyond that. Start while you still have several rolls on hand.
Thinking about moving your labels?
Send us a label straight off your shelf along with your roll specs, and we’ll help you plan the first run from there. You can also request a free sample pack to compare materials first, or get in touch to talk it through. We’re happy to help.