Growlers VS. Crowlers: What’s the Difference?

⚞ The Highlights:

  • A growler is a reusable jug, typically glass or stainless steel, for transporting draft beer. A crowler is a single-use 32-ounce aluminum can filled and sealed at the brewery on demand.
  • Printed cans are a third option more breweries are choosing for distribution and seasonal releases. The artwork goes directly on the aluminum, so there’s no separate label to apply or peel in a cooler.
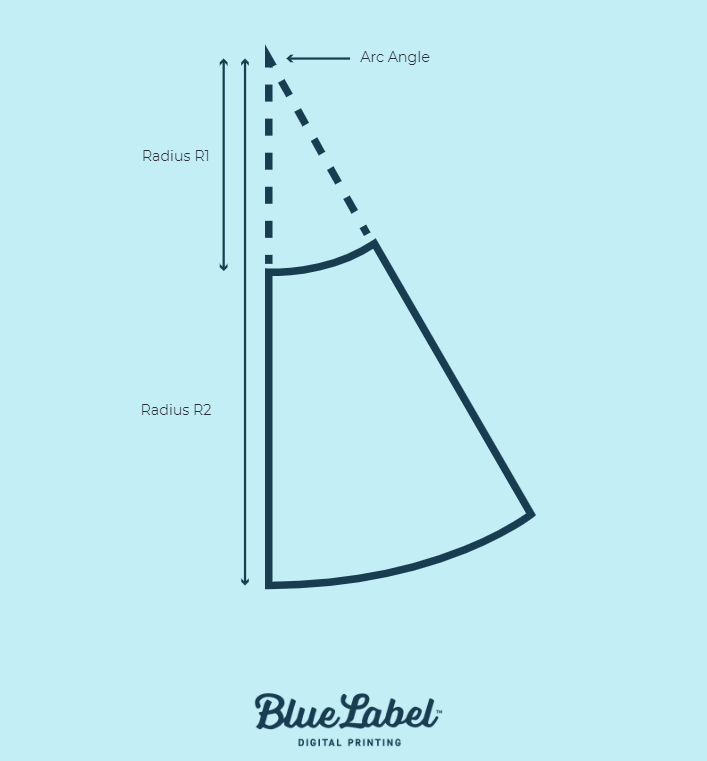
  • Growlers commonly come in 64 oz. jugs requiring labels around 4×6 inches, while crowlers are typically 32 oz. cans needing labels closer to 6×9.5 inches.
  • In comparison, a standard 12 oz. beer bottle or can holds less than a 32 or 64 oz. container and generally needs a shorter label, often around 3.625×8 inches.

Growlers, crowlers, and printed cans are three different ways breweries get fresh beer out of the taproom and into customers’ hands. A growler is a refillable glass jug, typically 64 ounces. A crowler is a single-use 32-ounce aluminum can filled and sealed at the bar. Printed cans take it a step further: the design is printed directly on the aluminum, so there’s no separate label at all.

Each has its place. We work with breweries on all three, and the right choice usually comes down to where the beer is going next. Here’s how to think about it.

What is a growler?

If you’ve ever left a brewery taproom with a jug of beer to drink at home that night, that was probably a growler. Growlers are airtight glass, steel, or ceramic jugs that hold draft beer for transport from the brewery. A standard growler holds 64 ounces, which is a little more than five 12-ounce beers. A half growler, sometimes called a howler, holds 32 ounces.

Growlers are reusable. Customers bring them back to the brewery for refills, which is why they’ve stayed popular with taproom-focused breweries that build local repeat business.

What is a crowler?

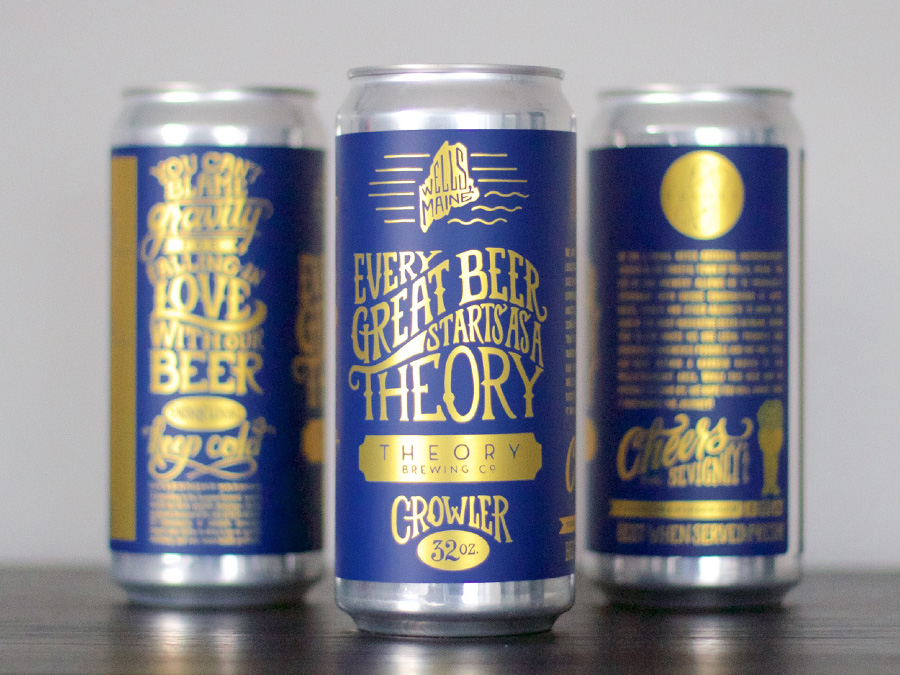
A crowler is a 32-ounce aluminum can filled and sealed on demand at the brewery. The name is a mash-up of “can” and “growler,” and the format borrows the best of both: the freshness of a growler fill with the durability of a can.

Crowlers are filled with a small countertop seamer that purges the can with CO₂, fills it with draft beer, and crimps a lid on top. Once sealed, they’re durable, fully opaque (no UV light getting through), and oxygen-free, which keeps the beer fresher for longer than a growler can.

Crowlers are single-use. After the beer is gone, the can goes in the recycling bin.

What about printed cans?

If your brewery has outgrown growler fills but isn’t ready to commit to massive offset can-printing minimums, printed cans are worth a look. Direct-to-object printing (sometimes called DTO or direct-to-can) puts a full-color design straight onto the aluminum. There’s no separate label to apply, no peeling in the cooler, and no warehouse full of pre-printed cans tying up cash.

For breweries running seasonal releases, one-off collaborations, or just trying out new artwork before committing to a long run, the math has shifted. Digital printing eliminates the plate costs that historically forced can printing into six-figure minimums. We typically work with breweries on minimums around 1,500 to 2,000 cans per design, which is realistic for a single seasonal SKU rather than a year’s worth of inventory upfront.

Worth knowing: Printed cans aren’t replacing growlers or crowlers. They’re a different tier of packaging for beer that’s leaving the taproom for retail, distribution, or events.

Growler vs. crowler vs. printed can: side by side

Growler Crowler Printed Can
Material Glass, steel, or ceramic Aluminum Aluminum
Typical size 32 or 64 oz 32 oz 12 oz standard, 12 oz sleek, or 16 oz
Reusable? Yes No (single use) No (single use)
Filled when At the taproom, on demand At the taproom, on demand In production, ahead of distribution
Where it can go Limited in glass-free areas (beaches, pools, parks, festivals) Anywhere cans are allowed Anywhere cans are allowed
Freshness once filled A few days Several weeks unopened Standard can shelf life (months)
Per-can cost Higher upfront for the jug, low per fill Low per can, plus labor and label at fill Drops with run size; accessible at smaller batches with digital printing
Best for Local taproom-to-home customers Outdoor venues, events, sample shipping Retail, distribution, planned seasonal SKUs

Glass growlers and aluminum crowlers: how they work

With growler bottles, the brewer fills the glass container with the beer of your choice and seals it under counter-pressure to lock in carbonation. The result is taproom-quality beer that travels home in good shape.

The process for a crowler is a little different. An aluminum can is sanitized and purged with CO₂ to push out the oxygen that degrades flavor. The can is filled with beer, then a small seamer (a machine that looks a bit like a sewing machine) raises the can and crimps a lid on top under pressure. A label goes on the can, and the customer walks out with a 32-ounce can of fresh draft beer.

Three crowlers with product labels attached.

Growler vs. crowler: size

Crowlers come in one size: 32 ounces, which is two pints. Growlers give you a little more flexibility. They typically come in 32-ounce or 64-ounce sizes, so you can pick up the equivalent of two pints or four pints in one container.

Growler vs. crowler: container upkeep

Like all glass, growlers need regular cleaning. Otherwise, foamy residue builds up and the next fill won’t taste as good as it should. Glass Jug Beer Lab recommends a few simple rules to keep growlers in good shape:

  • Store your growler cold until you have time to clean it to help limit bacterial growth.
  • Triple rinse with hot water to help ensure your growler is clean.
  • Air dry your growler upside down so that moisture can’t sit inside your container and spur bacterial growth.
  • Leave the cap off to prevent the air inside your growler from becoming stagnant.

Unlike a growler, a crowler is intended for a single use. Once you’ve finished it, rinse it out and recycle it. There’s nothing to clean and nothing to bring back.

Growler vs. crowler: where can they go?

The biggest practical difference between growlers and crowlers isn’t taste. It’s where you can take them. Beaches, bike paths, campgrounds, parks, pools, and public festivals tend to prohibit glass, which makes a crowler the better fit for any setting where glass is restricted.

Shipping is the other place this matters. Growlers can technically be shipped, but glass breaks and growlers often arrive flat. Crowlers ship better because aluminum is durable, the lid is airtight, and there’s no UV light penetration to mess with the beer. For breweries that send out samples or fulfill small online orders, crowlers and printed cans are the more reliable option.

A 64 oz. growler with a hang tag attached.

Growler vs. crowler: how much does each cost?

The last factor for most breweries is cost. The fills are similar in price, but the containers aren’t. Crowlers are usually cheaper per unit because the cans are inexpensive and there’s no reusable component. Some breweries even include the can in the price of the fill since they’re meant for one-time use.

Growlers cost more upfront because the customer is buying the jug along with the fill. The trade-off is that the jug comes back, and after the first purchase, refills are typically less expensive per ounce. If you want more beer in one trip, the 64-ounce growler is usually the better value.

Which is right for your brewery?

If your beer is mostly leaving the brewery in the hands of local customers, growlers are the classic option. They’re refillable, sustainable, and the customer comes back.

If you need a single-use, durable option for one-off fills, outdoor events, or shipping samples, crowlers are usually the answer. They’re cheap per can, glass-restriction-friendly, and they hold beer well unopened.

If you’re producing beer for distribution, retail, or planned seasonal releases, printed cans are worth a serious look. The per-can cost drops as the run grows, there are no labels to peel or apply, and the artwork becomes part of the shelf experience.

Worth knowing: Most breweries we work with use more than one. Growlers and crowlers cover the taproom. Printed cans cover everything that ships out into the world.

Frequently asked questions

How long does a crowler last compared to a growler?

A sealed crowler can stay fresh for several weeks unopened thanks to zero oxygen intake and no UV exposure through the aluminum. A growler, once filled, is best consumed within a few days. The seal on a growler isn’t as airtight as a crowler’s lid.

Can you ship a growler?

You can, but it’s risky. Glass can break in transit, and many growlers arrive flat. Crowlers and printed cans handle shipping much better because they’re durable and oxygen-sealed.

Do crowlers need labels?

Most do. Crowlers are typically blank aluminum cans labeled at the time of fill, so the brewery applies a pressure-sensitive label that identifies the beer, ABV, and any required information. Some breweries skip labels entirely on higher-volume SKUs by using printed cans instead.

Are printed cans cheaper than crowlers?

It depends on volume. Crowlers are inexpensive per can but require labor, a label, and a seamer at fill time. Printed cans require an upfront print run, but the cost per can drops as the order grows, and there’s no per-fill labor on the brewery’s end. Most breweries use crowlers for one-offs and printed cans for SKUs that justify a planned run.

What’s the minimum order for printed cans?

Traditional offset can printing required runs in the hundreds of thousands, which priced most craft breweries out. Digital direct-to-object printing has changed that. We typically work with breweries on minimums around 1,500 to 2,000 cans per design, which fits a single seasonal SKU rather than a year’s worth of inventory.

Can I refill a crowler?

No. Crowlers are designed for single use. Once you’ve finished it, the can goes in the recycling bin. Growlers are the reusable option.

Labels, crowlers, or printed cans: we can help you sort it out

The growler-versus-crowler decision used to be the only one. Now there’s a third option, and for breweries growing past taproom-only sales, printed cans are often the better fit. We work with breweries on all three formats: pressure-sensitive labels for growlers and crowlers, and digitally printed cans when the volume and timeline make sense.

If you’re sorting through which one fits your brewery’s stage, we’re here to help. Take a look at our digitally printed cans for a closer look at how the process works, or request a sample pack to see the print quality on actual aluminum. For label work on growlers, crowlers, or any other beer container, start here.

Can Metallic Labels Be Used on Cosmetic Containers?

Metallic labels can look great on cosmetic containers, as long as the label and the packaging actually work together. When they don’t, that’s when things go sideways: peeling, bubbling, or fading.

If you’re deciding whether metallic labels fit your product line, consider how they align with your brand image and product durability needs. Metallics can add a premium look to skincare or luxury products while adding matte or soft-touch finishes might better suit minimalist or eco-focused brands.

Below, we’ll walk through what actually makes a metallic label perform well on a cosmetic container, from material compatibility to design execution, so your labels don’t end up peeling, scratching, or underwhelming on the shelf.

Skincare product with metallic label

What Can Cause Metallic Label Failure on Cosmetic Containers?

Metallic labels are often used to enhance the look of skincare, personal care, and beauty products. But without the right specs, they can:

  • Bubble or lift on curved or textured surfaces
  • Scratch or smudge during shipping or use
  • Dull or discolor due to oils or moisture
  • Fail to meet FDA cosmetic labeling standards

Let’s break down what you need to consider to make sure that doesn’t happen.

Label Adhesion (Depends on the Container Material and Shape)

One of the most common causes of metallic label issues is an unexpected interaction between the label material and the container. Even high-quality labels can fail if the container surface isn’t compatible with the adhesive or material.

Common cosmetic container materials include:

  • Glass: Typically rigid and smooth, glass is ideal for metallic labels because it offers great adhesion and print clarity. However, textured or frosted glass can create uneven surfaces that make it harder for labels to fully bond, so proper adhesive selection and surface testing are important.
  • PET or HDPE plastic: Often used for lightweight or squeezable bottles and jars. These plastics have lower surface energy, meaning they naturally resist adhesives more easily unless you’re using the right adhesive. The label material itself also needs to flex with the container, so options like MDO or other conformable films are often ideal for these applications. 
  • Polypropylene (PP): Soft-touch or matte-finish Polypropylene bottles or jars can cause challenges unless the label film and adhesive are matched properly. For these types of containers, we typically recommend flexible materials like MDO or conformable metallic BOPP combined with a high-tack adhesive. These options maintain strong adhesion while allowing the label to move with the container, preventing edge lifting or wrinkling.
  • Aluminum or metal containers: These offer great adhesion potential, but surface oils or condensation can interfere with label performance if not accounted for. We generally recommend choosing a durable film like metallic BOPP or PET with an aggressive adhesive formulated for metal substrates. 

Container shape also matters:

  • Flat or slightly curved containers work well with metallic films.
  • Tapered, irregular, or squeezable containers require a conformable label material like metallic BOPP with a flexible adhesive setup, or a shrink sleeve for full 360° coverage and complex shapes; metallic effects are possible on shrink sleeves via metallic inks/films, but they require distortion compensation and pre-production testing.

Cosmetic containers with custom labels for Body scrub, lotion. sunscreen

Environmental Exposure

From production lines to bathroom counters, your products might take a beating. Every stage adds something: scratches, moisture, oil, or friction.

Here’s what your metallic labels might need to withstand:

  • Moisture and humidity in bathrooms, shipping containers, and storage
  • Oil exposure from skincare formulas like moisturizers, balms, and serums
  • Abrasion from being tossed in bags or drawers
  • Temperature swings from warehouse storage or transportation (and those fancy skincare fridges)
  • Friction between containers in boxes or on store shelves

To avoid fading or peeling, we often recommend using a laminate (like gloss, matte, or soft-touch) to protect the metallic surface. Learn more about lamination options here.

In production environments, factors like humidity, line speed, and container temperature during labeling can all affect performance. For example, labeling cold or damp containers can cause bubbling or lifting unless the adhesive is matched to those conditions. Make sure your label supplier knows how and where you’re applying labels.

Design and Print Execution

A metallic label only works if it gives you the effect you’re going for, and that comes down to thoughtful design and the right print approach.

Here’s how to get that right:

  • Use white ink underlays beneath your CMYK colors to create contrast and block out the metallic background in certain areas. Without this layer, colors can appear washed out or behave unpredictably. Think of it like priming a wall before you paint; it helps your colors show up the way you expect. White ink isn’t automatically added when printing on metallic materials, it has to be called out in your artwork or discussed during setup.
  • Metallic BOPP vs. foil stamping:
    • Metallic BOPP gives your entire label a subtle, metallic sheen and is ideal for full designs or longer production runs.
    • Foil stamping is an embellishment that adds reflective metallic accents like gold, silver, or copper to specific areas such as logos or borders.
  • Finish: Soft-touch or matte laminates tone down reflectivity for a more elegant feel. Gloss finishes enhance shine.
  • Spot embellishments like cold foil, screen printing, or spot UV can draw attention to logos or product names.

When preparing artwork, make sure your designer specifies white ink layers and metallic effects in vector format (AI or PDF files). Clearly label these layers so they can be processed correctly during print setup.

Compliance and Labeling Requirements

Cosmetic products sold in the U.S. must comply with FDA regulations (21 CFR 701) and, if applicable, ISO 22715. That includes requirements around:

  • Label durability and legibility under normal storage and use
  • Ingredient disclosure and readability (especially on metallic surfaces)
  • Label permanence meaning the printed information must stay attached and readable even after repeated handling, exposure to oils, or sitting on a bathroom counter

If your label flakes, smears, or fades out, that’s not just a bad look, it could be a labeling problem too.

For example, if ingredient text on a metallic label fades due to oil exposure, that could trigger a reprint or even a compliance issue. Simple adjustments like using an opaque white underlayer, increasing font weight, or selecting a protective laminate can prevent costly issues across product lines.

Sustainability and Recyclability

Most metallic labels, especially those made from metallic BOPP or PET, are not curbside recyclable unless the label is removed before recycling. If sustainability is a core priority, there are label options that can help you balance both goals:

  • Wash-off adhesives that allow labels to be removed cleanly during the recycling process, especially helpful if your containers are PET or glass and you want them to be fully recyclable
  • Cold foil embellishment over a recyclable face stock, which uses less material than full metallized films
  • Eco-friendly label materials made from post-consumer waste or engineered to minimize environmental impact

If sustainability matters to your brand, we’ll help you source the right materials and adhesives that meet your packaging and environmental goals. Look for certifications like FSC® or APR where your materials meet recognized recycling or sustainability standards. 

Quick Checklist: Is Your Metallic Label Ready for Cosmetic Containers?

  • Container is smooth or only slightly curved
  • Label material is flexible (e.g., metallic BOPP)
  • Adhesive is matched to the container surface and environment
  • Laminate protects against oils, abrasion, and moisture
  • White ink is used for legibility and color accuracy
  • Text meets FDA readability and durability standards
  • Application conditions (temperature, surface prep) are controlled
  • Sustainability options are considered if needed

Not sure if metallic BOPP will stick to your container? Contact us and we’ll send samples or talk through what you’re working with. We’ve printed metallic labels for skincare bottles, jars, and high-end cosmetics, and we’ll help you make the right decision.

How to Stop Labels from Peeling on Curved Surfaces

Nothing kills a good-looking product faster than a label that won’t stick. But don’t worry, with the right know-how (and a few smart material choices), keeping your labels smooth on a curved container, whether that’s a beer can, lip balm tube, or lotion bottle, is easier than you think.

Choose the Right Materials That Bend, Not Break

Labels on curves need to flex. Here’s what we recommend:

  • Shrink sleeves are often the best option for curved surfaces. Because the material is heat-shrunk to fit the container, it conforms to the container’s shape and provides full-coverage decoration.
  • MDO films are a type of film designed to stretch in multiple  directions, which helps them wrap smoothly around cylindrical and slightly tapered containers.
  • Flexible films like BOPP, or vinyl can work well, but be mindful of the curve. They’re reliable on gentle slopes and cylinders but can struggle on sharp tapers or irregular shapes where tension can cause lifting.

Lip balm tube labels

Match Adhesives to the Curve and Conditions

The label material matters, but it won’t do the job alone. If the adhesive isn’t right, your label’s going to lift.

  • Tight-mandrel adhesives, which are formulated specifically for narrow-diameter containers like lip balm tubes or small bottles, offer strong initial tack and the flexibility to hold under constant tension.
  • High-tack, flexible adhesives are better suited for curved or contoured areas. They provide immediate bonding strength, which helps prevent labels from lifting during or after application.
  • For slick or slippery surfaces like HDPE lotion bottles or yogurt tubs, use adhesives made for plastics that are notoriously hard for labels to stick to. These adhesives are engineered to grab hold of materials that most standard adhesives simply slide off of.
  • For labels applied to cold, wet, or moist surfaces, ask for adhesives that stick even if your container is damp or chilled.

Surface Prep: Clean, Dry, and Controlled

Once you have the right material and adhesive, preparing the container’s surface is the next important step:

  • Make sure there is no dust, oil, or condensation that could interfere with bonding.
  • Make sure containers are completely dry before label application.
  • Apply labels in a stable, controlled environment whenever possible. For best adhesion, room temperature conditions with moderate humidity are ideal. Try to avoid labeling in refrigerated warehouses or hot, humid loading docks where adhesion can fail quickly.

RTD Custom Can Label

Label Design and Application: Make It Fit and Stick

You’re here because you want your labels to stick, but don’t forget that with curves in your container come some label design considerations as well. Good design helps your label stay where it belongs:

If you’re using shrink sleeves, design your artwork with pre-shrink distortion in mind. Think of it like sketching on a balloon before you blow it up. Your artwork needs to land in the right spot after shrinking. Always place seams and folds away from key visual elements.

You’ll also want to consider some label decisions outside of the design itself:

  • Round label corners to reduce flagging and edge lift. Sharp corners tend to catch and peel over time.
  • Use tapered labels when your container narrows or flares. These follow the container’s shape and reduce tension that would otherwise lead to lifting.
  • Use rollers or automated application equipment for consistent pressure and alignment. Manual application can leave air pockets, uneven tension, or weak edges.

Don’t worry, we put together a guide on designing for tapered labels.

custom labels in short sauce bottles container

Protect for Wear: Laminates and Varnishes

Labels on curved containers often face friction from handling, transportation, and storage.

  • Laminates act like a clear protective shell. They help your label survive scratches, spills, and all the handling that comes with retail shelves or shipping. Choose laminates if your product is heavily handled, like beverage cans or personal care items. Options include gloss, matte, soft-touch, and textured finishes.
  • Varnishes are cured coatings that protect the printed surface while adding visual effects. They’re a more subtle option. Choose varnish if you want a sleeker look on wine bottles or gourmet foods where customers won’t handle the container as often.

Keep Your Labels from Peeling on Curved Surfaces

The right label won’t just stick, it’ll stay stuck. Choosing flexible materials, matching adhesives to your container and environment, and prepping properly makes all the difference. Not sure which label material makes sense for your bottles or tubes? Contact us and we’ll walk you through it.

How to Taper a Label for Your Products

Are you wondering how to put a label on a curved surface and how to apply them straight? Designing for a flat surface is pretty straightforward. A straight edge will still be straight, a square will still be a square, etc. Curved or inclined surfaces are more difficult. Depending on the shape of your container, especially if it’s tapered, this can be trickier than you expect.

A container is tapered when it isn’t perfectly cylindrical and gradually changes in width. An easy way to tell if your container has a tapered shape is tapered is to compare it to something that’s completely flat or straight, whether it’s something like a rectangular box or a ruler. If you stand both items next to each other and the side of your container isn’t flush against something flat, it has some degree of tapering to it.

Why Can’t You Use Rectangular Labels on Tapered Containers?

Tapered labels can create some problems for even the most basic of label shapes. Straight lines appear uneven when placed on tapered containers, even if the change in width is very slight. This can lead to crooked label placement or noticeable creases or bulges that result in an unprofessional overall packaging design.

While it may seem easy to simply switch to a non-tapered container, these labeling challenges shouldn’t scare you away from utilizing uniquely-shaped packaging that stands out to your consumers. Even standard beer bottles feature a tapered neck, so you may not be able to avoid some form of tapering depending on your container.

You also may not want to change your container. Tapered shapes can attract eyes and create an exclusive silhouette for your brand. Instead of settling for standard containers, you can create a curved dieline that will allow your custom product labels to account for the gradual tapering of your container.

Labels that were tapered for custom-shaped bottles.


Looking for Custom Labels?

We put our all into every custom label we make. No exceptions. And with no minimum order quantities and a 5-day turnaround for digital label printing, we take pride in helping you perfect your first impression.

Request a Quote    Get a Sample Pack


How to Adjust Your Label to Fit a Tapered Container

One option is to downsize your label so that the effect of the tapering isn’t as noticeable. However, this limits the amount of label space you have to showcase your brand, describe your product, and include any necessary regulatory information.

The other option is to tailor your label to better suit the shape of your container or tapered bottle. If you still want your label to look rectangular, you’ll need to create a curved dieline. You’ll need to do some math to figure out the right shape, but the process may not be as tricky as you think.

Step 1: Decide where your label should go

Before you can solve anything, you’ll need to acquire some information. First, figure out exactly where you want your label to stick to your container. Since the width of your container gradually changes, it’s important to measure exactly where a label needs to go or else your measurements could be wrong. This also means you should have an idea of whether you want a partial or full wrap for your label as that will greatly impact the width. Once you’re set, use a pen, pencil, tape, or some other item to mark where the top, bottom, and sides of your label should go.

Step 2: Measure your dimensions

Once you have your container marked, you’ll want to measure the following:

  • Width of the top of your label
  • Width of the bottom of your label
  • Height of your label

Regular rulers won’t be too helpful in this stage since you’ll need something that can curl around your container and measure the top and bottom parts of your label. If you don’t have a loose tape measure, contact your Blue Label representative and request a custom flexible ruler or you can download and print a paper ruler. Another is to wrap string around your container and mark or cut it to fit the right lengths.

Please note that if you measure completely around your container, those measurements will make for a full wrap label dieline. If you don’t want a full wrap label, you’ll want to factor in your desired gap into the measurements. Once you’re all set, you can use your measurements to create a curved shape in Adobe Illustrator.

Step 3: Use Adobe Illustrator to create a curved dieline

In order to turn your measurements into an actual curved shape, you’ll need to do some geometry. Fortunately, there’s a convenient online cone calculator that will do the hard work for you. All you need to do is plug in the height and widths from your container to generate the following measurements.

  • Arc angle
  • Radius 1
  • Radius 2

A cone with measurements used to taper product labels.

These numbers will allow you to create your exact custom container label shape in Illustrator. First, take each radius and create a pair of circles that share a common center (also known as concentric circles). Now you can use the drawing and transform tools to create a triangle that shares an apex point with the center of the two circles. The triangle should use the arc angle generated by the calculator and extend past the larger of the two circles. In the end, the two circles and triangle will intersect to create a curved dieline for your container.

Example dielines for rectangular and tapered labels.

Step 4: Identify an ideal rectangular shape

Even though you have a curved dieline, you still need to figure out how to warp your design to fit your container. To start, you’ll want to convert your curved dieline into an ideal rectangular shape.

Before you find your shape, make sure to add a bleed area that extends your design artwork at least 1/16” past the edges of your curved label dieline. This will add some extra insurance that your labels don’t have any accidental white spaces once they’re cut. It’s also important to add this now because you’ll need to measure the top and bottom chords of your label to identify your ideal rectangular shape. A chord is the straight line between two corners of a curved dieline.

Once you use Illustrator to find these measurements, you’ll then need to average the top and bottom length together. You can now build out your ideal rectangular shape with the measurements for the average chord length and your original height and use the Illustrator warp tool to curve your artwork.

Make Sure Your Labels Stay Ahead of the Curve

Preparing a label for a tapered container may seem like a lot of work, but it doesn’t mean you have to settle for something you don’t want. At Blue Label Packaging Company, our experts work directly with you to ensure that your tapered labels are catered to your needs. That way, you don’t have to sacrifice your container or other important aspects of your packaging. If you need a professional designer to help you create a specific look for your products, we can even point you toward our approved designer directory.

Ready to wow your customers with tapered product labels by using our custom label printing? Contact us today to talk to one of our experts about your label design and project.

Types of Labels for Unique Containers: What You Need to Know

Uniquely-shaped product containers can make for eye-catching packaging. However, designing the right label to fit on the container may present some challenges. You’ll have to get creative as you factor in the shape and size of the containers and the different materials you can use to create your label. Below, we’ve outlined several different label considerations for your uniquely-shaped containers.

Specialty Die Cut Labels

Designing a specialty die cut label is the most common way to create the most versatile packaging for your container. These labels can be cut to your exact specifications, no matter the shape of your container, ensuring a perfect fit all around.

Die cut label


Tapered Labels

Tapered bottles or containers are unique in that they aren’t perfectly cylindrical. A standard label won’t lay flat when adhered to your container, which is when tapered labels come in handy. Instead, tapered labels can be made to form perfectly by calculating the degree of tapering on your container. Using this type of label will ensure it won’t crease or slant on your tapered container.

Double Sided Labels

Containers made of clear material may benefit from double-sided labels. These labels give you twice the space to market your products and can add depth and originality to your uniquely-shaped container. While important information like nutritional content and FDA warnings need to be clearly displayed on the front of your label, the second side can be used to add a surprise or accent like a patterned background or catchy slogan that you might have not have space for on the primary side.

Specialty Materials

In addition to the type of label, you’ll also want to consider the material of your label. For instance, if you’re in need of a label for a uniquely shaped bottle or tube that will be squeezed a lot, MDO film is a flexible, moldable material that’s much less rigid compared to a paper stock. For products like lotions or shampoos, when you squeeze the bottle, the MDO resists wrinkling and creasing. MDO is just one of hundreds of specialty materials that can be chosen to accommodate your containers needs and functionality.

Custom Packaging Labels

Whatever type of packaging or containers you use, it’s important to work with a digital label printing company that can create high-quality labels to meet your unique needs.

Blue Label is a digital printing company that will work with you to create custom labels for your unique packaging. Our state-of-the-art HP Indigo digital printing presses allow us to find the best solution to provide you with labels that not only attract eyes, but also best suits the needs of your product.

If you need help with your label design, check out our Designer Directory to find the right partner for your product. Once you’re ready to start your next project, contact us to talk to one of our experts about how we can create custom labels for your brand.

4 Critical Factors for Your E-Juice Label

E-juice labels may seem overwhelming at first, but they’re a lot less intimidating if you can nail down these four crucial details.
(more…)